Appearance
Table of Contents generated with DocToc
MVVM
MVVM consists of the following three contents
- View: interface
- Model:Data model
- ViewModel:As a bridge responsible for communicating View and Model
In the JQuery period, if you need to refresh the UI, you need to get the corresponding DOM and then update the UI, so the data and business logic are strongly-coupled with the page.
In MVVM, the UI is driven by data. Once the data is changed, the corresponding UI will be refreshed. If the UI changes, the corresponding data will also be changed. In this way, we can only care about the data flow in business processing without dealing with the page directly. ViewModel only cares about the processing of data and business and does not care how View handles data. In this case, we can separate the View from the Model. If either party changes, it does not necessarily need to change the other party, and some reusable logic can be placed in a ViewModel, allowing multiple Views to reuse this ViewModel.
In MVVM, the core is the two-way binding of data, such as dirty checking by Angular and data hijacking in Vue.
Dirty Checking
When the specified event is triggered, it will enter the dirty checking and call the $digest loop to walk through all the data observers to determine whether the current value is different from the previous value. If a change is detected, it will call the $watch function, and then call the $digest loop again until no changes are found. The cycle is at least two times, up to ten times.
Although dirty checking has inefficiencies, it can complete the task without caring about how the data is changed, but the two-way binding in Vue is problematic. And dirty checking can achieve batch detection of updated values, and then unified update UI, greatly reducing the number of operating DOM. Therefore, inefficiency is also relative, and this is what the benevolent sees the wise and sees wisdom.
Data hijacking
Vue internally uses Object.defineProperty() to implement two-way binding, which allows you to listen for events of set and get.
js
var data = { name: 'yck' }
observe(data)
let name = data.name // -> get value
data.name = 'yyy' // -> change value

function observe(obj) {
    // judge the type
  if (!obj || typeof obj !== 'object') {
    return
  }
  Object.keys(obj).forEach(key => {
    defineReactive(obj, key, obj[key])
  })
}

function defineReactive(obj, key, val) {
    // recurse the properties of child
  observe(val)
  Object.defineProperty(obj, key, {
    enumerable: true,
    configurable: true,
    get: function reactiveGetter() {
      console.log('get value')
      return val
    },
    set: function reactiveSetter(newVal) {
      console.log('change value')
      val = newVal
    }
  })
}
The above code simply implements how to listen for the set and get events of the data, but that's not enough. You also need to add a Publish/Subscribe to the property when appropriate.
html
<div>
    {{name}}
</div>
In the process of parsing the template code like above, when encountering {{name}}, add a publish/subscribe to the property name
js
// decouple by Dep
class Dep {
  constructor() {
    this.subs = []
  }
  addSub(sub) {
    // Sub is an instance of Watcher
    this.subs.push(sub)
  }
  notify() {
    this.subs.forEach(sub => {
      sub.update()
    })
  }
}
// Global property, configure Watcher with this property
Dep.target = null

function update(value) {
  document.querySelector('div').innerText = value
}

class Watcher {
  constructor(obj, key, cb) {
    // Point Dep.target to itself
    // Then trigger the getter of the property to add the listener
    // Finally, set Dep.target as null
    Dep.target = this
    this.cb = cb
    this.obj = obj
    this.key = key
    this.value = obj[key]
    Dep.target = null
  }
  update() {
    // get the new value
    this.value = this.obj[this.key]
    // update Dom with the update method
    this.cb(this.value)
  }
}
var data = { name: 'yck' }
observe(data)
// Simulate the action triggered by parsing the `{{name}}`
new Watcher(data, 'name', update)
// update Dom innerText
data.name = 'yyy'
Next, improve on the defineReactive function.
js
function defineReactive(obj, key, val) {
  // recurse the properties of child
  observe(val)
  let dp = new Dep()
  Object.defineProperty(obj, key, {
    enumerable: true,
    configurable: true,
    get: function reactiveGetter() {
      console.log('get value')
      // Add Watcher to the subscription
      if (Dep.target) {
        dp.addSub(Dep.target)
      }
      return val
    },
    set: function reactiveSetter(newVal) {
      console.log('change value')
      val = newVal
      // Execute the update method of Watcher
      dp.notify()
    }
  })
}
The above implements a simple two-way binding. The core idea is to manually trigger the getter of the property to add the Publish/Subscribe.
Proxy vs. Object.defineProperty
Although Object.defineProperty has been able to implement two-way binding, it is still flawed.
- It can only implement data hijacking on properties, so it needs deep traversal of the entire object
- it can't listen to changes in data for arrays
Although Vue can detect the changes in array data, it is actually a hack and is flawed.
js
const arrayProto = Array.prototype
export const arrayMethods = Object.create(arrayProto)
// hack the following functions
const methodsToPatch = [
  'push',
  'pop',
  'shift',
  'unshift',
  'splice',
  'sort',
  'reverse'
]
methodsToPatch.forEach(function (method) {
    // get the native function
  const original = arrayProto[method]
  def(arrayMethods, method, function mutator (...args) {
      // call the native function
    const result = original.apply(this, args)
    const ob = this.__ob__
    let inserted
    switch (method) {
      case 'push':
      case 'unshift':
        inserted = args
        break
      case 'splice':
        inserted = args.slice(2)
        break
    }
    if (inserted) ob.observeArray(inserted)
      // trigger the update
    ob.dep.notify()
    return result
  })
})
On the other hand, Proxy doesn't have the above problem. It natively supports listening to array changes and can intercept the entire object directly, so Vue will also replace Object.defineProperty with Proxy in the next big version.
js
let onWatch = (obj, setBind, getLogger) => {
  let handler = {
    get(target, property, receiver) {
      getLogger(target, property)
      return Reflect.get(target, property, receiver);
    },
    set(target, property, value, receiver) {
      setBind(value);
      return Reflect.set(target, property, value);
    }
  };
  return new Proxy(obj, handler);
};

let obj = { a: 1 }
let value
let p = onWatch(obj, (v) => {
  value = v
}, (target, property) => {
  console.log(`Get '${property}' = ${target[property]}`);
})
p.a = 2 // bind `value` to `2`
p.a // -> Get 'a' = 2
Routing principle
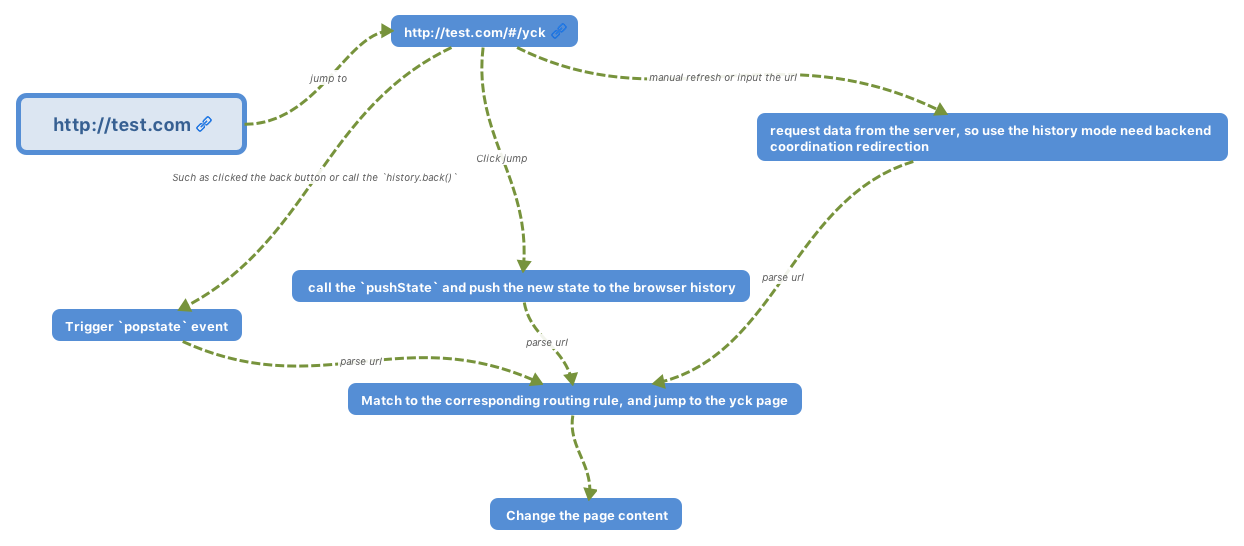
The front-end routing is actually very simple to implement. The essence is to listen to changes in the URL, then match the routing rules, display the corresponding page, and no need to refresh. Currently, there are only two implementations of the route used by a single page.
- hash mode
- history mode
www.test.com/#/ is the hash URL. When the hash value after # changes, no request will be sent to server. You can listen to the URL change through the hashchange event, and then jump to the corresponding page.

History mode is a new feature of HTML5, which is more beautiful than Hash URL.
Virtual Dom
Why Virtual Dom is needed
As we know, modifying DOM is a costly task. We could consider using JS objects to simulate DOM objects, since operating on JS objects is much more time saving than operating on DOM.
For example
js
// Let's assume this array simulates a ul which contains five li's.
[1, 2, 3, 4, 5]
// using this to replace the ul above.
[1, 2, 5, 4]
From the above example, it's apparent that the first ul's 3rd li is removed, and the 4th and the 5th are exchanged positions.
If the previous operation is applied to DOM, we have the following code:
js
// removing the 3rd li
ul.childNodes[2].remove()
// interexchanging positions between the 4th and the 5th
let fromNode = ul.childNodes[4]
let toNode = node.childNodes[3]
let cloneFromNode = fromNode.cloneNode(true)
let cloneToNode = toNode.cloneNode(true)
ul.replaceChild(cloneFromNode, toNode)
ul.replaceChild(cloneToNode, fromNode)
Of course, in actual operations, we need an identifier for each node, as an index for checking if two nodes are identical. This is why both Vue and React's official documentation suggests using a unique identifier key for nodes in a list to ensure efficiency.
DOM element can not only be simulated, but they can also be rendered by JS objects.
Below is a simple implementation of a JS object simulating a DOM element.
js
export default class Element {
  /**
   * @param {String} tag 'div'
   * @param {Object} props { class: 'item' }
   * @param {Array} children [ Element1, 'text']
   * @param {String} key option
   */
  constructor(tag, props, children, key) {
    this.tag = tag
    this.props = props
    if (Array.isArray(children)) {
      this.children = children
    } else if (isString(children)) {
      this.key = children
      this.children = null
    }
    if (key) this.key = key
  }
  // render
  render() {
    let root = this._createElement(
      this.tag,
      this.props,
      this.children,
      this.key
    )
    document.body.appendChild(root)
    return root
  }
  create() {
    return this._createElement(this.tag, this.props, this.children, this.key)
  }
  // create an element
  _createElement(tag, props, child, key) {
    // create an element with tag
    let el = document.createElement(tag)
    // set properties on the element
    for (const key in props) {
      if (props.hasOwnProperty(key)) {
        const value = props[key]
        el.setAttribute(key, value)
      }
    }
    if (key) {
      el.setAttribute('key', key)
    }
    // add children nodes recursively
    if (child) {
      child.forEach(element => {
        let child
        if (element instanceof Element) {
          child = this._createElement(
            element.tag,
            element.props,
            element.children,
            element.key
          )
        } else {
          child = document.createTextNode(element)
        }
        el.appendChild(child)
      })
    }
    return el
  }
}
Virtual Dom algorithm introduction
The next step after using JS to implement DOM element is to detect object changes.
DOM is a multi-branching tree. If we were to compare the old and the new trees thoroughly, the time complexity would be O(n ^ 3), which is simply unacceptable. Therefore, the React team optimized their algorithm to achieve an O(n) complexity for detecting changes.
The key to achieving O(n) is to only compare the nodes on the same level rather than across levels. This works because in actual usage we rarely move DOM elements across levels.
We then have two steps of the algorithm.
- from top to bottom, from left to right to iterate the object, aka depth first search. This step adds an index to every node, for rendering the differences later.
- whenever a node has a child element, we check whether the child element changed.
Virtual Dom algorithm implementation
recursion of the tree
First let's implement the recursion algorithm of the tree. Before doing that, let's consider the different cases of comparing two nodes.
- new node's
tagNameorkeyis different from that of the old one. This means the old node is replaced, and we don't have to recurse on the node any more because the whole subtree is removed. - new node's
tagNameandkey(maybe nonexistent) are the same as the old's. We start recursing on the subtree. - no new node appears. No operation needed.
js
import { StateEnums, isString, move } from './util'
import Element from './element'

export default function diff(oldDomTree, newDomTree) {
  // for recording changes
  let patches = {}
  // the index starts at 0
  dfs(oldDomTree, newDomTree, 0, patches)
  return patches
}

function dfs(oldNode, newNode, index, patches) {
  // for saving the subtree changes
  let curPatches = []
  // three cases
  // 1. no new node, do nothing
  // 2. new nodes' tagName and `key` are different from the old one's, replace
  // 3. new nodes' tagName and key are the same as the old one's, start recursing
  if (!newNode) {
  } else if (newNode.tag === oldNode.tag && newNode.key === oldNode.key) {
    // check whether properties changed
    let props = diffProps(oldNode.props, newNode.props)
    if (props.length) curPatches.push({ type: StateEnums.ChangeProps, props })
    // recurse the subtree
    diffChildren(oldNode.children, newNode.children, index, patches)
  } else {
    // different node, replace
    curPatches.push({ type: StateEnums.Replace, node: newNode })
  }

  if (curPatches.length) {
    if (patches[index]) {
      patches[index] = patches[index].concat(curPatches)
    } else {
      patches[index] = curPatches
    }
  }
}
checking property changes
We also have three steps for checking for property changes
- iterate the old property list, check if the property still exists in the new property list.
- iterate the new property list, check if there are changes for properties existing in both lists.
- for the second step, also check if a property doesn't exist in the old property list.
js
function diffProps(oldProps, newProps) {
  // three steps for checking for props
  // iterate oldProps for removed properties
  // iterate newProps for changed property values
  // lastly check if new properties are added
  let change = []
  for (const key in oldProps) {
    if (oldProps.hasOwnProperty(key) && !newProps[key]) {
      change.push({
        prop: key
      })
    }
  }
  for (const key in newProps) {
    if (newProps.hasOwnProperty(key)) {
      const prop = newProps[key]
      if (oldProps[key] && oldProps[key] !== newProps[key]) {
        change.push({
          prop: key,
          value: newProps[key]
        })
      } else if (!oldProps[key]) {
        change.push({
          prop: key,
          value: newProps[key]
        })
      }
    }
  }
  return change
}
Algorithm Implementation for Detecting List Changes
This algorithm is the core of the Virtual Dom. Let's go down the list. The main steps are similar to checking property changes. There are also three steps.
- iterate the old node list, check if the node still exists in the new list.
- iterate the new node list, check if there is any new node.
- for the second step, also check if a node moved.
PS: this algorithm only handles nodes with keys.
js
function listDiff(oldList, newList, index, patches) {
  // to make the iteration more convenient, first take all keys from both lists
  let oldKeys = getKeys(oldList)
  let newKeys = getKeys(newList)
  let changes = []

  // for saving the node data after changes
  // there are several advantages of using this array to save
  // 1. we can correctly obtain the index of the deleted node
  // 2. we only need to operate on the DOM once for interexchanged nodes
  // 3. we only need to iterate for the checking in the `diffChildren` function
  //    we don't need to check again for nodes existing in both lists
  let list = []
  oldList &&
    oldList.forEach(item => {
      let key = item.key
      if (isString(item)) {
        key = item
      }
      // checking if the new children has the current node
      // if not then delete
      let index = newKeys.indexOf(key)
      if (index === -1) {
        list.push(null)
      } else list.push(key)
    })
  // array after iterative changes
  let length = list.length
  // since deleting array elements changes the indices
  // we remove from the back to make sure indices stay the same
  for (let i = length - 1; i >= 0; i--) {
    // check if the current element is null, if so then it means we need to remove it
    if (!list[i]) {
      list.splice(i, 1)
      changes.push({
        type: StateEnums.Remove,
        index: i
      })
    }
  }
  // iterate the new list, check if a node is added or moved
  // also add and move nodes for `list`
  newList &&
    newList.forEach((item, i) => {
      let key = item.key
      if (isString(item)) {
        key = item
      }
      // check if the old children has the current node
      let index = list.indexOf(key)
      // if not then we need to insert
      if (index === -1 || key == null) {
        changes.push({
          type: StateEnums.Insert,
          node: item,
          index: i
        })
        list.splice(i, 0, key)
      } else {
        // found the node, need to check if it needs to be moved.
        if (index !== i) {
          changes.push({
            type: StateEnums.Move,
            from: index,
            to: i
          })
          move(list, index, i)
        }
      }
    })
  return { changes, list }
}

function getKeys(list) {
  let keys = []
  let text
  list &&
    list.forEach(item => {
      let key
      if (isString(item)) {
        key = [item]
      } else if (item instanceof Element) {
        key = item.key
      }
      keys.push(key)
    })
  return keys
}
Iterating and Marking Child Elements
For this function, there are two main functionalities.
- checking differences between two lists
- marking nodes
In general, the functionalities implemented are simple.
js
function diffChildren(oldChild, newChild, index, patches) {
  let { changes, list } = listDiff(oldChild, newChild, index, patches)
  if (changes.length) {
    if (patches[index]) {
      patches[index] = patches[index].concat(changes)
    } else {
      patches[index] = changes
    }
  }
  // marking last iterated node
  let last = null
  oldChild &&
    oldChild.forEach((item, i) => {
      let child = item && item.children
      if (child) {
        index =
          last && last.children ? index + last.children.length + 1 : index + 1
        let keyIndex = list.indexOf(item.key)
        let node = newChild[keyIndex]
        // only iterate nodes existing in both lists
        // no need to visit the added or removed ones
        if (node) {
          dfs(item, node, index, patches)
        }
      } else index += 1
      last = item
    })
}
Rendering Difference
From the earlier algorithms, we can already get the differences between two trees. After knowing the differences, we need to locally update DOM. Let's take a look at the last step of Virtual Dom algorithms.
Two main functionalities for this function
- Deep search the tree and extract the nodes needing modifications
- Locally update DOM
This code snippet is pretty easy to understand as a whole.
js
let index = 0
export default function patch(node, patches) {
  let changes = patches[index]
  let childNodes = node && node.childNodes
  // this deep search is the same as the one in diff algorithm
  if (!childNodes) index += 1
  if (changes && changes.length && patches[index]) {
    changeDom(node, changes)
  }
  let last = null
  if (childNodes && childNodes.length) {
    childNodes.forEach((item, i) => {
      index =
        last && last.children ? index + last.children.length + 1 : index + 1
      patch(item, patches)
      last = item
    })
  }
}

function changeDom(node, changes, noChild) {
  changes &&
    changes.forEach(change => {
      let { type } = change
      switch (type) {
        case StateEnums.ChangeProps:
          let { props } = change
          props.forEach(item => {
            if (item.value) {
              node.setAttribute(item.prop, item.value)
            } else {
              node.removeAttribute(item.prop)
            }
          })
          break
        case StateEnums.Remove:
          node.childNodes[change.index].remove()
          break
        case StateEnums.Insert:
          let dom
          if (isString(change.node)) {
            dom = document.createTextNode(change.node)
          } else if (change.node instanceof Element) {
            dom = change.node.create()
          }
          node.insertBefore(dom, node.childNodes[change.index])
          break
        case StateEnums.Replace:
          node.parentNode.replaceChild(change.node.create(), node)
          break
        case StateEnums.Move:
          let fromNode = node.childNodes[change.from]
          let toNode = node.childNodes[change.to]
          let cloneFromNode = fromNode.cloneNode(true)
          let cloneToNode = toNode.cloneNode(true)
          node.replaceChild(cloneFromNode, toNode)
          node.replaceChild(cloneToNode, fromNode)
          break
        default:
          break
      }
    })
}
The End
The implementation of the Virtual Dom algorithms contains the following three steps:
- Simulate the creation of DOM objects through JS
- Check differences between two objects
- Render the differences
js
let test4 = new Element('div', { class: 'my-div' }, ['test4'])
let test5 = new Element('ul', { class: 'my-div' }, ['test5'])

let test1 = new Element('div', { class: 'my-div' }, [test4])

let test2 = new Element('div', { id: '11' }, [test5, test4])

let root = test1.render()

let patches = diff(test1, test2)
console.log(patches)

setTimeout(() => {
  console.log('start updating')
  patch(root, patches)
  console.log('end updating')
}, 1000)
Although the current implementation is simple, it's definitely enough for understanding Virtual Dom algorithms.