Appearance
Table of Contents generated with DocToc
Event mechanism
The three phases of event propagation
Event propagation has three phases:
- The event object propagates from the Window to the target’s parent. Capturing events will trigger.
- The event object arrives at the event object’s event target. Events registered to target will trigger.
- The event object propagates from the target's parent up to the Window. Bubbling events will trigger.
Event propagation generally follows the above sequence, but there are exceptions. If a target node is registered for both bubbling and capturing events, events are invoked in the order they were registered.
js
// The following code will print bubbling first and then trigger capture events
node.addEventListener('click',(event) =>{
	console.log('bubble')
},false);
node.addEventListener('click',(event) =>{
	console.log('capture')
},true)
Event Registration
Usually, we use addEventListener to register an event, and the useCapture is a function parameter, which receives a Boolean value, the default value is false. useCapture determines whether the registered event is a capturing event or a bubbling event. For the object parameter, you can use the following properties:
capture, Boolean value, same asuseCaptureonce, Boolean value,trueindicating that the callback should be called at most once, after invoked the listener will be removedpassive, Boolean, means it will never callpreventDefault
Generally speaking, we only want the event to trigger on the target. To achieve this we can use stopPropagation to prevent the propagation of the event. Usually, we would think that stopPropagation is used to stop the event bubbling, but this function can also prevent the event capturing. stopImmediatePropagation can achieve the same effects, and it can also prevent other listeners of the same event from being called.
js
node.addEventListener('click',(event) =>{
	event.stopImmediatePropagation()
	console.log('bubbling')
},false);
// Clicking node will only execute the above function, this function will not execute
node.addEventListener('click',(event) => {
	console.log('capture ')
},true)
Event Delegation
If a child node inside a parent node is dynamically generated, events on the child node should be added to parent node:
html
<ul id="ul">
	<li>1</li>
    <li>2</li>
	<li>3</li>
	<li>4</li>
	<li>5</li>
</ul>
<script>
	let ul = document.querySelector('#ul')
	ul.addEventListener('click', (event) => {
		console.log(event.target);
	})
</script>
Event delegation has the following advantages over adding events straight to child nodes:
- Save memory
- No need remove event listeners on child nodes
Cross Domain
Browsers have the same-origin policy for security reasons. In other words, if the protocol, domain name or port has one difference, that would be cross-domain, and the Ajax request will fail.
We can solve the cross-domain issues through following methods:
JSONP
The principle of JSONP is very simple, that is to make use of the <script> tag not subject to same-origin policy. Use the src attribute of <script> tag and provide a callback function to receive data:
js
<script src="http://domain/api?param1=a¶m2=b&callback=jsonp"></script>
<script>
function jsonp(data) {
console.log(data)
}
</script>JSONP is simple to use and has good compatibility, but is limited to get requests.
You may encounter the situation where you have the same callback names in multiple JSONP requests. In this situation you need to encapsulate JSONP. The following is a simple implementation:
js
function jsonp(url, jsonpCallback, success) {
  let script = document.createElement("script");
  script.src = url;
  script.async = true;
  script.type = "text/javascript";
  window[jsonpCallback] = function(data) {
    success && success(data);
  };
  document.body.appendChild(script);
}
jsonp(
  "http://xxx",
  "callback",
  function(value) {
    console.log(value);
  }
);
CORS
CORS requires browser and backend support at the same time. Internet Explorer 8 and 9 expose CORS via the XDomainRequest object.
The browser will automatically perform CORS. The key to implementing CORS is the backend. As long as the backend implements CORS, it enables cross-domain.
The server sets Access-Control-Allow-Origin to enable CORS. This property specifies which domains can access the resource. If set to wildcard, all websites can access the resource.
document.domain
This can only be used for the same second-level domain, for example, a.test.com and b.test.com are suitable for this case.
Set document.domain = 'test.com' would enable CORS within the same second-level domain.
postMessage
This method is usually used to get data from embedded third-party page. One page sends a message, the other page checks the source and receives the message:
js
// send of page
window.parent.postMessage('message', 'http://test.com');
// receive of page
var mc = new MessageChannel();
mc.addEventListener('message', (event) => {
    var origin = event.origin || event.originalEvent.origin;
    if (origin === 'http://test.com') {
        console.log('success')
    }
});
Event Loop
As we all know, JS is a non-blocking and single-threaded language, because JS was born to interact with the browser in the beginning. If JS was a multi-threaded language, we might have problems handling DOM in multiple threads (imagine adding nodes in a thread and deleting nodes in another thread at the same time), however we could introduce a read-write lock to solve this problem.
Execution context, generated during JS execution, will be pushed into call stack sequentially. Asynchronous codes will hang up and get pushed into the task queues (there are multiple kinds of tasks). Once the call stack is empty, the Event Loop will process the next message in the task queues and push it into the call stack for execution, thus essentially the asynchronous operation in JS is actually synchronous.
js
console.log('script start');

setTimeout(function() {
  console.log('setTimeout');
}, 0);

console.log('script end');
The above code is asynchronous, even though the setTimeout delay is 0. That’s because the HTML5 standard stipulates that the second parameter of the function setTimeout must not be less than 4 milliseconds, otherwise it will automatically . So setTimeout is still logged after script end.
Different tasks are assigned to different Task queues. Tasks can be divided into microtasks and macrotasks. In the ES6 specification, a microtask is called a job and a macrotask is called a task.
js
console.log('script start');

setTimeout(function() {
  console.log('setTimeout');
}, 0);

new Promise((resolve) => {
    console.log('Promise')
    resolve()
}).then(function() {
  console.log('promise1');
}).then(function() {
  console.log('promise2');
});

console.log('script end');
// script start => Promise => script end => promise1 => promise2 => setTimeout
Although setTimeout is set before Promise, the above printing still occurs because Promise belongs to microtask and setTimeout belongs to macrotask.
Microtasks include process.nextTick, promise, Object.observe and MutationObserver.
Macrotasks include script, setTimeout, setInterval, setImmediate, I/O and UI rendering.
Many people have the misunderstanding that microtasks always get executed before macrotasks and this is incorrect. Because the macrotask includes script, the browser will perform this macrotask first, followed by any microtasks in asynchronous codes.
So the correct sequence of an event loop looks like this:
- Execute synchronous codes, which belongs to macrotask
- Once call stack is empty, query if any microtasks need to be executed
- Execute all the microtasks
- If necessary, render the UI
- Then start the next round of the Event loop, and execute the asynchronous operations in the macrotask
According to the above sequence of the event loop, if the asynchronous codes in the macrotask have a large number of calculations and need to operate on DOM, we can put DOM operation into microtask for faster interface response.
Event Loop in Node
The event loop in Node is not the same as in the browser.
The event loop in Node is divided into 6 phases, and they will be executed in order repeatedly:
   ┌───────────────────────┐
┌─>│        timers         │
│  └──────────┬────────────┘
│  ┌──────────┴────────────┐
│  │     pending callbacks │
│  └──────────┬────────────┘
│  ┌──────────┴────────────┐
│  │     idle, prepare     │
│  └──────────┬────────────┘      ┌───────────────┐
│  ┌──────────┴────────────┐      │   incoming:   │
│  │         poll          │<──---|   connections │
│  └──────────┬────────────┘      │   data, etc.  │
│  ┌──────────┴────────────┐      └───────────────┘
│  │        check          │
│  └──────────┬────────────┘
│  ┌──────────┴────────────┐
└──┤    close callbacks    │
   └───────────────────────┘
timer
The timer phase executes the callbacks of setTimeout and setInterval.
Timer specifies the time that callbacks will run as early as they can be scheduled, after the specified amount of time has passed rather than the exact time a person wants it to be executed.
The lower bound time has a range: [1, 2147483647]. If the set time is not in this range, it will be set to 1.
pending callbacks
This phase executes I/O callbacks deferred to the next loop iteration.
idle, prepare
The idle, prepare phase is for internal implementation.
poll
This phase retrieves new I/O events; execute I/O related callbacks (almost all with the exception of close callbacks, the ones scheduled by timers, and setImmediate()); node will block here when appropriate.
The poll phase has two main functions:
- Calculating how long it should block and poll for I/O, then
- Processing events in the poll queue.
When the event loop enters the poll phase and there are no timers scheduled, one of two things will happen:
- If the
pollqueue is not empty, the event loop will iterate through its queue of callbacks executing them synchronously until either the queue has been exhausted, or the system-dependent hard limit is reached. - If the
pollqueue is empty, one of two more things will happen:- If scripts have been scheduled by
setImmediate. the event loop will end thepollphase and continue to the check phase to execute those scheduled scripts. - If scripts have not been scheduled by
setImmediate, the event loop will wait for callbacks to be added to the queue, then execute them immediately.
- If scripts have been scheduled by
Once the poll queue is empty the event loop will check for timers whose time thresholds have been reached. If one or more timers are ready, the event loop will wrap back to the timers phase to execute those timers' callbacks.
check
The check phase executes the callbacks of setImmediate.
close callbacks
The close event will be emitted in this phase.
And in Node, the order of execution of timers is random in some cases:
js
setTimeout(() => {
    console.log('setTimeout');
}, 0);
setImmediate(() => {
    console.log('setImmediate');
})
// Here, it may log setTimeout => setImmediate
// It is also possible to log the opposite result, which depends on performance
// Because it may take less than 1 millisecond to enter the event loop, `setImmediate` would be executed at this time.
// Otherwise it will execute `setTimeout`
Certainly, in this case, the execution order is the same:
js
var fs = require('fs')

fs.readFile(__filename, () => {
    setTimeout(() => {
        console.log('timeout');
    }, 0);
    setImmediate(() => {
        console.log('immediate');
    });
});
// Because the callback of `readFile` was executed in `poll` phase
// Founding `setImmediate`,it immediately jumps to the `check` phase to execute the callback
// and then goes to the `timer` phase to execute `setTimeout`
// so the above output must be `setImmediate` => `setTimeout`
The above is the implementation of the macrotask. The microtask will be executed immediately after each phase is completed.
js
setTimeout(()=>{
    console.log('timer1')

    Promise.resolve().then(function() {
        console.log('promise1')
    })
}, 0)

setTimeout(()=>{
    console.log('timer2')

    Promise.resolve().then(function() {
        console.log('promise2')
    })
}, 0)
// The log result is different, when the above code is executed in browser and node
// In browser, it will log: timer1 => promise1 => timer2 => promise2
// In node, it may log: timer1 => timer2 => promise1 => promise2
// or timer1, promise1, timer2, promise2
process.nextTick in Node will be executed before other microtasks.
js
setTimeout(() => {
  console.log("timer1");

  Promise.resolve().then(function() {
    console.log("promise1");
  });
}, 0);

process.nextTick(() => {
  console.log("nextTick");
});
// nextTick => timer1 => promise1
Storage
cookie,localStorage,sessionStorage,indexDB
| features | cookie | localStorage | sessionStorage | indexDB |
|---|---|---|---|---|
| Life cycle of data | generally generated by the server, but you can set the expiration time | unless cleared manually, it always exists | once the browser tab is closed, it will be cleaned up immediately | unless cleared manually, it always exists |
| Storage size of data | 4K | 5M | 5M | unlimited |
| Communication with server | it is carried in the header everytime, and has a performance impact on the request | doesn't participate | doesn't participate | doesn't participate |
As we can see from the above table, cookies are no longer recommended for storage. We can use localStorage and sessionStorage if we don't have much data to store. Use localStorage to store data that doesn't change much, otherwise sessionStorage can be used.
For cookies, we also need pay attention to security issue.
| attribute | effect |
|---|---|
| value | the value should be encrypted if used to save the login state, and the cleartext user ID shouldn't be used |
| http-only | cookies cannot be accessed through JS, for reducing XSS attack |
| secure | cookies can only be carried in requests with HTTPS protocol |
| same-site | browsers cannot pass cookies in cross-origin requests, for reducing CSRF attacks |
Service Worker
Service workers essentially act as proxy servers that sit between web applications, the browser and the network (when available). They are intended, among other things, to enable the creation of effective offline experiences, intercept network requests and take appropriate action based on whether the network is available, and update assets residing on the server. They will also allow access to push notifications and background sync APIs.
At present, this technology is usually used to cache files and increase the render speed of the first screen. We can try to implement this function:
js
// index.js
if (navigator.serviceWorker) {
  navigator.serviceWorker
    .register("sw.js")
    .then(function(registration) {
      console.log("service worker register success");
    })
    .catch(function(err) {
      console.log("servcie worker register error");
    });
}
// sw.js
// Listen for the `install` event, and cache the required files in the callback
self.addEventListener("install", e => {
  e.waitUntil(
    caches.open("my-cache").then(function(cache) {
      return cache.addAll(["./index.html", "./index.js"]);
    })
  );
});

// intercept all the request events
// use the cache directly if the requested data already existed in the cache; otherwise, send requests for data
self.addEventListener("fetch", e => {
  e.respondWith(
    caches.match(e.request).then(function(response) {
      if (response) {
        return response;
      }
      console.log("fetch source");
    })
  );
});
Open the page, we can see that the Service Worker has started in the Application pane of devTools:

In the Cache pane, we can also find that the files we need have been cached:

Refreshing the page, we can see that our cached data is read from the Service Worker:

Rendering mechanism
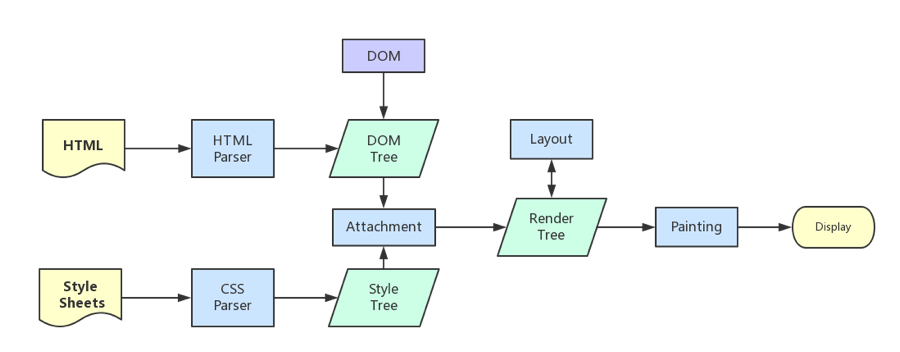
The mechanism of the browser engine usually has the following steps:
Parse HTML to construct the DOM tree.
Parse CSS to construct the CSSOM tree.
Create the render tree by combining the DOM & CSSOM.
Run layout based on the render tree, then calculate each node's exact coordinates on the screen.
Paint elements by GPU, composite layers and display on the screen.
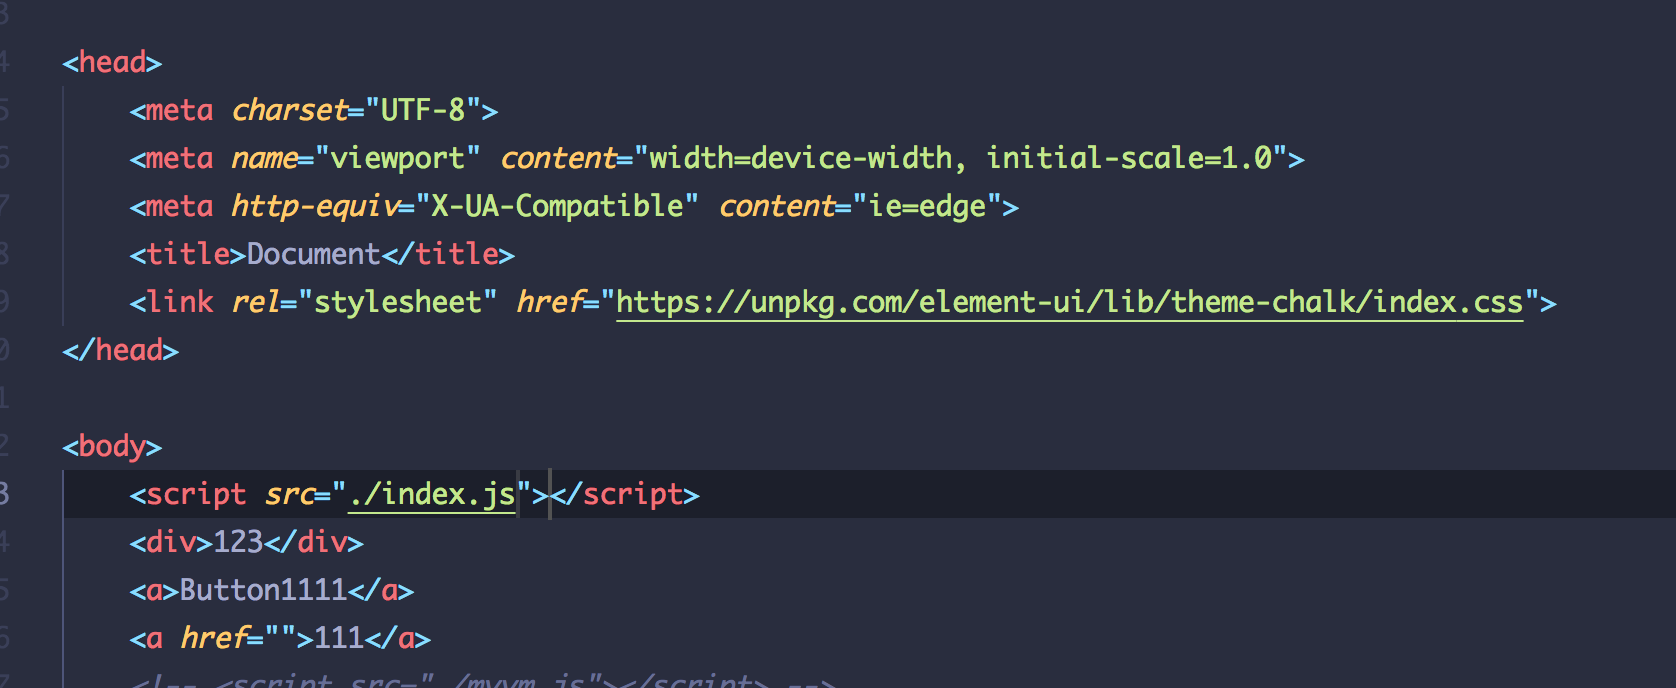
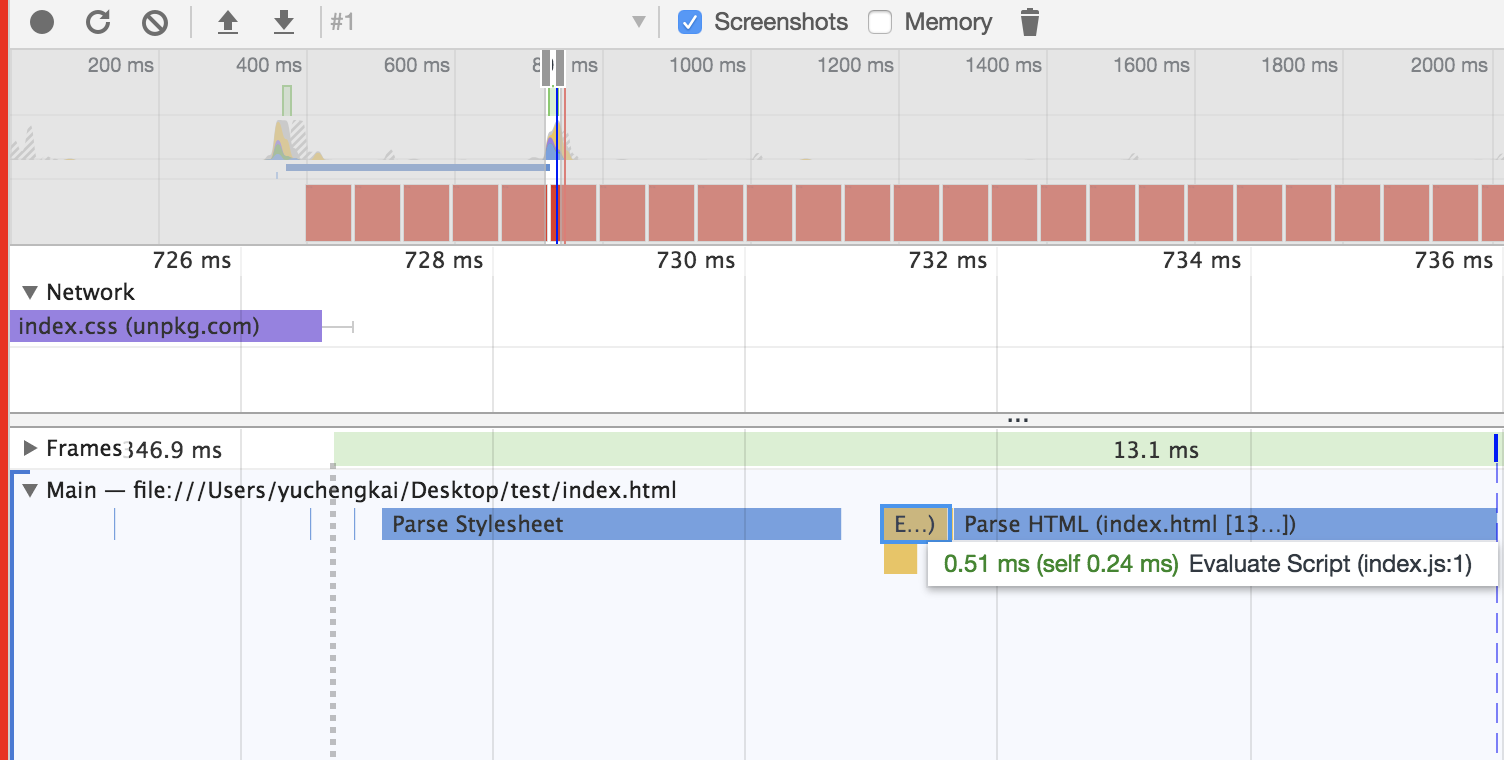
When building the CSSOM tree, the rendering is blocked until the CSSOM tree is built. And building the CSSOM tree is a very cost-intensive process, so you should try to ensure that the level is flat and reduce excessive cascading. The more specific the CSS selector is, the slower the execution.
When the HTML is parsing the script tag, the DOM is paused and will restart from the paused position. In other words, the faster you want to render the first screen, the less you should load the JS file on the first screen. And CSS will also affect the execution of JS. JS will only be executed when the stylesheet is parsed. Therefore, it can be considered that CSS will also suspend the DOM in this case.
Difference between Load & DOMContentLoaded
Load event occurs when all the resources (e.g. DOM、CSS、JS、pictures) have been loaded.
DOMContentLoaded event occurs as soon as the HTML of the pages has been loaded, no matter whether the other resources have been loaded.
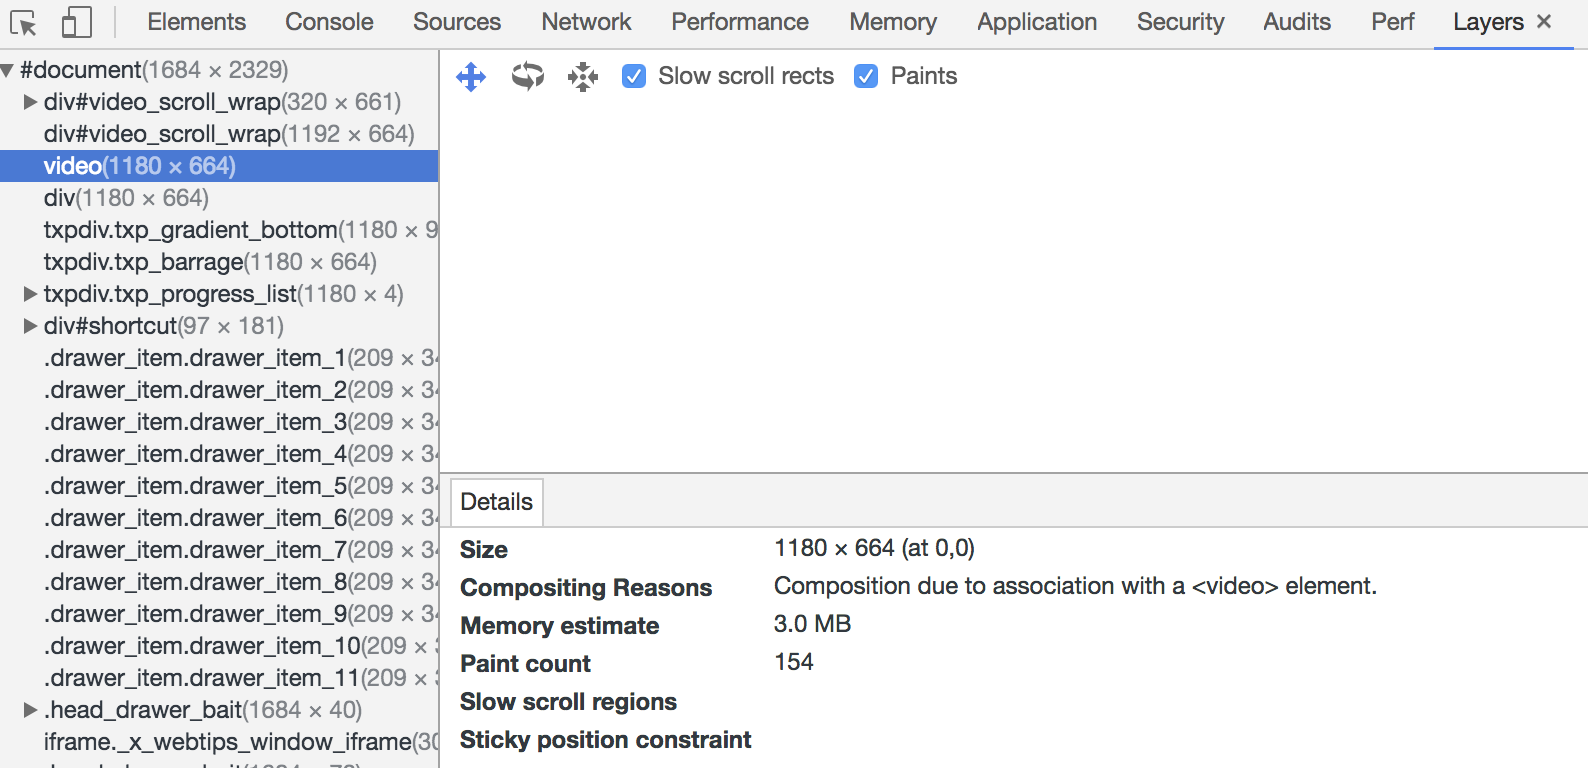
Layers
Generally,we can treat the document flow as a single layer. Some special attributes also could create a new layer. Different Layers are independent. So, it is recommended to create a new layer to render some elements which changes frequently. But it is also a bad idea to create too many layers.
The following attributes usually can create a new layer:
3Dtranslate:
translate3d,translateZwill-changetags like:
video,iframeanimation achieved by
opacityposition: fixed
Repaint & Reflow
Repaint and Reflow is a small step in the main rendering flow, but they have a great impact on the performance.
Repaint occurs when the node changes but doesn't affect the layout, e.g.
color.Reflow occurs when the node changes caused by layout or the geometry attributes.
Reflow will trigger a Repaint, but the opposite is not necessarily true. Reflow is much more expensive than Repaint. The changes in deep level node's attributes may cause a series of changes of its ancestral nodes.
Actions like the following may cause performance problems:
change the window's size
change font-family
add or delete styles
change texts
change position & float
change box model
You may not know that Repaint and Reflow has something to do with the Event Loop.
In a event loop, when a microtask finishes, the engine will check whether the document needs update. As the refresh rate of the browse is 60Hz, this means it will update every 16ms.
Then browser would check whether there are events like
resizeorscrolland if true, trigger the handlers. So the handlers of resize and scroll will be invoked every 16ms, which means automatic throttling.Evaluate media queries and report changes.
Update animations and send events.
Check whether this is a full-screen event.
Execute
requestAnimationFramecallback.Execute
IntersectionObservercallback, which is used to determine whether an element should be displaying, usually in lazy-load, but has poor compatibility.Update the screen.
The above events may occur in every frame. If there is idle time, the
requestIdleCallbackcallback will be called.
All of the above are from HTML Documents.
Minimize Repaint & Reflow
- Use
translateinstead oftop:
html
<div class="test"></div>
<style>
	.test {
		position: absolute;
		top: 10px;
		width: 100px;
		height: 100px;
		background: red;
	}
</style>
<script>
	setTimeout(() => {
        // occurs reflow
		document.querySelector('.test').style.top = '100px'
	}, 1000)
</script>
Use
visibilityinstead ofdisplay: none, because the former will only cause Repaint while the latter will cause Reflow, which changes the layout.Change the DOM when it is offline, e.g. change the DOM 100 times after set it
display: noneand then show it on screen. During this process there is only one Reflow.Do not put an attribute of a node inside a loop:
js
for(let i = 0; i < 1000; i++) {
    // it will cause the reflow to get offsetTop, because it need to calculate the right value
    console.log(document.querySelector('.test').style.offsetTop)
}
Do not use table to construct the layout, because even a little change will cause the re-construct.
Animation speed matters: the faster it goes, the more Reflow. You can also utilize
requestAnimationFrame.The css selector will search to match from right to left, so you'd better avoid deep level DOM node.
As we know that the layer will prevent the changed node from affecting others, so it is good practice to create a new layer for animations with high frequency.