Appearance
Deploying
The following guides are based on some shared assumptions:
- You are placing your docs inside the
docsdirectory of your project; - You are using the default build output location (
.vitepress/dist); - VitePress is installed as a local dependency in your project, and you have setup the following npm scripts:
json
{
  "scripts": {
    "docs:build": "vitepress build docs",
    "docs:serve": "vitepress serve docs"
  }
}
Build and test locally
You may run yarn docs:build command to build the docs.
bash
$ yarn docs:buildBy default, the build output will be placed at .vitepress/dist. You may deploy this dist folder to any of your preferred platforms.
Once you've built the docs, you may test them locally by running yarn docs:serve command.
bash
$ yarn docs:build
$ yarn docs:serve
The serve command will boot up local static web server that serves the files from .vitepress/dist at http://localhost:5000. It's an easy way to check if the production build looks OK in your local environment.
You may configure the port of the server py passing --port flag as an argument.
json
{
  "scripts": {
    "docs:serve": "vitepress serve docs --port 8080"
  }
}
Now the docs:serve method will launch the server at http://localhost:8080.
GitHub Pages
Set the correct
baseindocs/.vitepress/config.js.If you are deploying to
https://<USERNAME>.github.io/, you can omitbaseas it defaults to'/'.If you are deploying to
https://<USERNAME>.github.io/<REPO>/, for example your repository is athttps://github.com/<USERNAME>/<REPO>, then setbaseto'/<REPO>/'.Inside your project, create
deploy.shwith the following content (with highlighted lines uncommented appropriately), and run it to deploy:
bash
#!/usr/bin/env sh

# abort on errors
set -e

# build
npm run docs:build

# navigate into the build output directory
cd docs/.vitepress/dist

# if you are deploying to a custom domain
# echo 'www.example.com' > CNAME

git init
git add -A
git commit -m 'deploy'

# if you are deploying to https://<USERNAME>.github.io
# git push -f [email protected]:<USERNAME>/<USERNAME>.github.io.git main

# if you are deploying to https://<USERNAME>.github.io/<REPO>
# git push -f [email protected]:<USERNAME>/<REPO>.git main:gh-pages

cd -
TIP
You can also run the above script in your CI setup to enable automatic deployment on each push.
GitHub Pages and Travis CI
Set the correct
baseindocs/.vitepress/config.js.If you are deploying to
https://<USERNAME or GROUP>.github.io/, you can omitbaseas it defaults to'/'.If you are deploying to
https://<USERNAME or GROUP>.github.io/<REPO>/, for example your repository is athttps://github.com/<USERNAME>/<REPO>, then setbaseto'/<REPO>/'.Create a file named
.travis.ymlin the root of your project.Run
yarnornpm installlocally and commit the generated lockfile (that isyarn.lockorpackage-lock.json).Use the GitHub Pages deploy provider template, and follow the Travis CI documentation.
yaml
language: node_js
node_js:
  - lts/*
install:
  - yarn install # npm ci
script:
  - yarn docs:build # npm run docs:build
deploy:
  provider: pages
  skip_cleanup: true
  local_dir: docs/.vitepress/dist
  # A token generated on GitHub allowing Travis to push code on you repository.
  # Set in the Travis settings page of your repository, as a secure variable.
  github_token: $GITHUB_TOKEN
  keep_history: true
  on:
    branch: main
GitLab Pages and GitLab CI
Set the correct
baseindocs/.vitepress/config.js.If you are deploying to
https://<USERNAME or GROUP>.gitlab.io/, you can omitbaseas it defaults to'/'.If you are deploying to
https://<USERNAME or GROUP>.gitlab.io/<REPO>/, for example your repository is athttps://gitlab.com/<USERNAME>/<REPO>, then setbaseto'/<REPO>/'.Set
outDirin.vitepress/config.jsto../public.Create a file called
.gitlab-ci.ymlin the root of your project with the content below. This will build and deploy your site whenever you make changes to your content:
yaml
image: node:10.22.0
pages:
  cache:
    paths:
      - node_modules/
  script:
    - yarn install # npm install
    - yarn docs:build # npm run docs:build
  artifacts:
    paths:
      - public
  only:
    - main
Netlify
- On Netlify, setup up a new project from GitHub with the following settings:
- Build Command:
vitepress build docsoryarn docs:buildornpm run docs:build - Publish directory:
docs/.vitepress/dist
- Hit the deploy button.
Google Firebase
Make sure you have firebase-tools installed.
Create
firebase.jsonand.firebasercat the root of your project with the following content:
firebase.json:
json
{
  "hosting": {
    "public": "./docs/.vitepress/dist",
    "ignore": []
  }
}.firebaserc:
js
{
 "projects": {
   "default": "<YOUR_FIREBASE_ID>"
 }
}- After running
yarn docs:buildornpm run docs:build, deploy using the commandfirebase deploy.
Surge
First install surge, if you haven’t already.
Run
yarn docs:buildornpm run docs:build.Deploy to surge by typing
surge docs/.vitepress/dist.
You can also deploy to a custom domain by adding surge docs/.vitepress/dist yourdomain.com.
Heroku
Install Heroku CLI.
Create a Heroku account by signing up.
Run
heroku loginand fill in your Heroku credentials:
bash
$ heroku login- Create a file called
static.jsonin the root of your project with the below content:
static.json:
json
{
  "root": "./docs/.vitepress/dist"
}
This is the configuration of your site; read more at heroku-buildpack-static.
- Set up your Heroku git remote:
bash
# version change
$ git init
$ git add .
$ git commit -m "My site ready for deployment."

# creates a new app with a specified name
$ heroku apps:create example

# set buildpack for static sites
$ heroku buildpacks:set https://github.com/heroku/heroku-buildpack-static.git- Deploy your site:
bash
# publish site
$ git push heroku main

# opens a browser to view the Dashboard version of Heroku CI
$ heroku open
Vercel
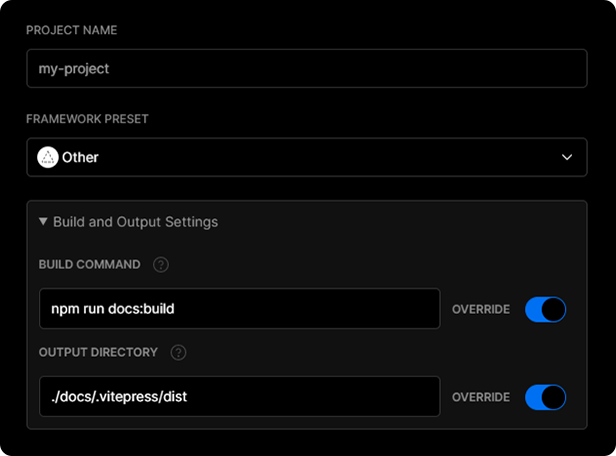
To deploy your VitePress app with a Vercel for Git, make sure it has been pushed to a Git repository.
Go to https://vercel.com/new and import the project into Vercel using your Git of choice (GitHub, GitLab or BitBucket). Follow the wizard to select the project root with the project's package.json and override the build step using yarn docs:build or npm run docs:build and the output dir to be ./docs/.vitepress/dist
After your project has been imported, all subsequent pushes to branches will generate Preview Deployments, and all changes made to the Production Branch (commonly "main") will result in a Production Deployment.
Once deployed, you will get a URL to see your app live, such as the following: https://vitepress.vercel.app